Here are 2 methods for removing a version of an element. The first method is limited to rolling back the latest version, however, the second will allow a rollback to any version. It's not a good idea to delete a version in ClearCase because they can be problematic.
Method 1- Subtractive Merge:
cleartool merge -graphical -to {ELEMENT} -delete -version {VERSION}
e.g cleartool merge -graphical -to deploy-lib-init.xml -delete -version \main\37
If no manual merges were required on checkin ,then chances are this will be resolved automatically. All of the data for this can be obtained by right clicking on the element in ClearCase Explorer -> Properties of version. You should get a window like:
**NOTE** Because the window has a fixed size you cant see the whole string for "Name", I would advise copying the string into a text editor.
D:\CC\CASPA\willis7_CASPA_int\IPS_Source\System\build\deploy-lib-init.xml@@\main\37
The two highlighted parts are the ELEMENT and VERSION respectively.
Method 2- Hijack with older version:
cleartool get –to {ELEMENT} {ELEMENT}@@{VERSION}
e.g. cleartool get –to deploy-lib-init.xml deploy-lib-init.xml@@\main\5
A slightly easier approach. This involves hijacking your local version with a version specified by yourself (the example above would take version 5). This can then be checked out and back in to create a new version that replicates the specified version.
When we make any changes to our databases we like to restart the application servers to refresh the datasources. Some of our development environments are run as Windows services and so it would be nice to restart them remotely from the build machines. Here's how with Ant:
I hope you can see in this snippet that the code runs 2 tasks - Stop and Start. You can break down the code if you just want a Start or Stop only script.
Something simple, but very effective!
I want you to do something for me; at the top of the browser you’re reading this on there should be a help button (unless you’re on a mobile device). Click it, then click the about option. You should be presented with something similar to this:
If the application you or your company is developing doesn’t have this feature then you need to give yourself a slap on the wrist and ask yourself, WHY? As a release engineer we’re often expected to know exactly what’s in every environment at all times. If you’re a small organisation with only a few projects and deliveries then this is sometimes possible, but even then what happens if you go on holiday and someone else covers for you??
If you’re using Ant I would advise writing a small task that will pull a few basic parameters from your build machine. Some useful properties to gather are the following:
Username
Build Machine
Date
Time
Build Number
Here’s the Ant target I use. It includes some ClearCase stuff (the source tool we use) but I thought I would leave it in for information.
Write some code to get this to display in your app then its job done!
I want you to do something for me; at the top of the browser you’re reading this on there should be a help button (unless you’re on a mobile device). Click it, then click the about option. You should be presented with something similar to this:
If the application you or your company is developing doesn’t have this feature then you need to give yourself a slap on the wrist and ask yourself, WHY? As a release engineer we’re often expected to know exactly what’s in every environment at all times. If you’re a small organisation with only a few projects and deliveries then this is sometimes possible, but even then what happens if you go on holiday and someone else covers for you??
If you’re using Ant I would advise writing a small task that will pull a few basic parameters from your build machine. Some useful properties to gather are the following:
Username
Build Machine
Date
Time
Build Number
Here’s the Ant target I use. It includes some ClearCase stuff (the source tool we use) but I thought I would leave it in for information.
 <target name="buildinfo" description="Record build metadata">

 <echo message="${line.separator}" file="${build.props.file}" append="true"/>

 <echo message="buildby=${env.USERNAME}${line.separator}" file="${build.props.file}" append="true"/>

 <echo message="host=${env.COMPUTERNAME}${line.separator}" file="${build.props.file}" append="true"/>

 <echo message="builddate=${build.time}${line.separator}" file="${build.props.file}" append="true"/>

 <echo message="buildview=${cc.view}${line.separator}" file="${build.props.file}" append="true"/>

 <echo message="buildstream=${cc.stream}${line.separator}" file="${build.props.file}" append="true"/>

 <echo message="buildproject=${cc.project}${line.separator}" file="${build.props.file}" append="true"/>

 <echo message="foundationbaseline=${cc.found-baselines}${line.separator}" file="${build.props.file}" append="true"/>

 <echo message="recommendedbaseline=${cc.rec-baseline}${line.separator}" file="${build.props.file}" append="true"/>

 <echo message="Projrecommendedbaseline=${cc.rec-bline-stream}${line.separator}" file="${build.props.file}" append="true"/>

 <echo message="currentbaselines=${cc.current-baselines}${line.separator}" file="${build.props.file}" append="true"/>

 </target>
Write some code to get this to display in your app then its job done!
Posted by
Sion
at
10:43
As I mentioned in my previous post, my favourite email plugin is the Email-ext plugin . Here's the configurations I use for notifying people when build conditions are met.
UNSTABLE
$PROJECT_DEFAULT_CONTENT
Failing tests:
${FAILED_TESTS}
When a build becomes unstable it's telling you a build has been succesful, but some of your JUnit tests have failed. It is a good idea to let the whole team know this has happened and send them the list of failed tests.
FAILURE
$PROJECT_DEFAULT_CONTENT
Build started by ${CAUSE}
Changes since last build:
${CHANGES}
A failed build is more serious than an unstable build because someone has submitted code that is erraneous and could impact everyone else who is working on the CI stream. For this reason we need to monitor what has been submitted since the last working build and why the build was started.
STILL FAILING
$PROJECT_DEFAULT_CONTENT
Build started by ${CAUSE}
Changes since last build:
${CHANGES_SINCE_LAST_SUCCESS}
This is the same as a failing build, but instead of notifying everyone, we now only email submitters. The reason for this is because they're adding to a broken environment, hopefully this will encourage the developer to chase down the error and fix it so that they can check their own build status.
FIXED
$PROJECT_DEFAULT_CONTENT
STILL UNSTABLE
$PROJECT_DEFAULT_CONTENT
Failing tests:
${FAILED_TESTS}
This is the same as still failing but instead we report the failed tests to the submitter in the hope they will fix the issue. If not then you need to turn Judge Dredd on them!
Posted by
Sion
at
09:32
In the company I work for Cruise Control has always been the primary continuous integration tool. When I was asked to add a few projects to Cruise Control I thought it would be a fairly straightforward task.... I was wrong. Cruise Control works by setting up your projects with a series of .xml files and running a batch file that pulls the configurations from these files and starts the continuous polling.
Thankfully, Jenkins(Hudson at the time) was in the pipeline and I was given the responsibility of migrating one of our latest projects to it. Jenkins is a very easy to use tool which hides much of the 'hard' configuration behind a GUI.
One thing to note here is that you will be downloading a .war file NOT a .zip . This caused a great deal of confusion when I downloaded this from a Windows PC and it decided to rename the file to a .zip - furthermore, Winzip will happily open the file as if it was a .zip . If this happens simply change the file extension to .war.
On the host machine you can now start running Jenkins. To get Jenkins running I created a small batch file (Linux script here):
@ECHO off
@rem *************************************************************************
@rem PROPERTIES - Set these here.
@rem
@rem *************************************************************************
SET HTTP_PORT="8080"
SET AJP_PORT="8000"
SET JAVA_HOME=D:\Tools\jdk\jdk160_14_R27.6.5-32
@rem JAVA properties
SET MAX_PERM_SIZE=128m
@rem *************************************************************************
@rem Make sure you have a Java JDK on your machine and that you have it added
@rem to the PATH environment variable
@rem *************************************************************************
SET PATH=%JAVA_HOME%\bin;%PATH%
@rem *************************************************************************
@rem Set the window title. Change project name to suit
@rem *************************************************************************
TITLE Jenkins Continuous Integration
@rem Start Jenkins
java -jar jenkins.war --httpPort=%HTTP_PORT% --ajp13Port=%AJP_PORT% -XX:MaxPermSize=%MAX_PERM_SIZE%
Thankfully, Jenkins(Hudson at the time) was in the pipeline and I was given the responsibility of migrating one of our latest projects to it. Jenkins is a very easy to use tool which hides much of the 'hard' configuration behind a GUI.
Installing Jenkins
To run Jenkins you must first download it from the Jenkins website and save it to a sensible location. The latest version can be found at the Jenkins Website.One thing to note here is that you will be downloading a .war file NOT a .zip . This caused a great deal of confusion when I downloaded this from a Windows PC and it decided to rename the file to a .zip - furthermore, Winzip will happily open the file as if it was a .zip . If this happens simply change the file extension to .war.
On the host machine you can now start running Jenkins. To get Jenkins running I created a small batch file (Linux script here):
@ECHO off
@rem *************************************************************************
@rem PROPERTIES - Set these here.
@rem
@rem *************************************************************************
SET HTTP_PORT="8080"
SET AJP_PORT="8000"
SET JAVA_HOME=D:\Tools\jdk\jdk160_14_R27.6.5-32
@rem JAVA properties
SET MAX_PERM_SIZE=128m
@rem *************************************************************************
@rem Make sure you have a Java JDK on your machine and that you have it added
@rem to the PATH environment variable
@rem *************************************************************************
SET PATH=%JAVA_HOME%\bin;%PATH%
@rem *************************************************************************
@rem Set the window title. Change project name to suit
@rem *************************************************************************
TITLE Jenkins Continuous Integration
@rem Start Jenkins
java -jar jenkins.war --httpPort=%HTTP_PORT% --ajp13Port=%AJP_PORT% -XX:MaxPermSize=%MAX_PERM_SIZE%
Audit Trail – Keeps a log of who performed particular Jenkins operations, such as configuring jobs.
Wiki
Download
A very simple plugin that logs all actions performed in Jenkins. If you suspect someone is messing with your hard work then check the log and find out. The log also tells how each build was started which is also another good bit of information.
Claim – Allow broken build claiming.
Wiki
Download
I’ve often experimented with project configurations which have broken the builds which have then sent an email notifying the whole team. It’s a poor use of resources if you have developers looking for faults in the build when you know you are the cause. This is where the plugin comes in. By claiming a build you’re ultimately telling the team “I broke the build and I’m working on fixing it”, this can save masses of developers time by not having them all looking for the same problem.
Console Column – provides a fast-path console link available for views.
Wiki
Download
Very simple but effective plugin that adds a link to one or more (Last Console, last failed, last stable, last successful or last unsuccessful) consoles. I’ve created an “All Projects” view and added a column to link all last consoles.
Description Setter - sets the description for each build, based upon a RegEx test of the build log file.
Wiki
Download
If like me you have your build output lots of information in your logs you can look for this information and tie it to a build. I use Rational ClearCase for my source control and when I create a build I always pull down information about the baseline I’m using. All I need to do is set up a regular expression for this information then the plugin sets this information next to build.
Disk Usage – record individual project disk usage.
Wiki
Download
Storage is cheap these days but you should still keep tabs on how much your CI is using. A great plugin for this is the Disk Usage plugin. It does exactly what it says on the tin so I won’t keep on. There is one caveat, and that is at the time of writing if you have several jobs sharing the same workspace it will think they are separate and add them all together. I have 3 jobs but only a single workspace (3gb) unfortunately this plugin does a 3x3 calculation and reports that I’m using 9gb - obviously that isn’t correct.
Email-ext – replacement for Jenkins email publisher.
Wiki
Download
The email publisher built into Jenkins is good, but this is so much better. With this tool you can specify what information is emailed, to whom and for what condition.
The plugin works around the concept of triggers. Triggers are conditions that are met and warrant some action. Let’s say a build fails, you may want the whole team to know so that it can be resolved. However, if a developer submits a failing test you may not want to send everyone an email, just the culprit. The plugin allows you to do all of this as well as customise the emails you send. This is a great tool that we can’t live without now.
Job Config History – saves copies of all job and system configurations. Wiki
Download
Have you ever changed the configuration of a build, it’s started failing but you can’t remember what you changed? Well, that’s exactly what this plugin solves. If you go into one of your jobs you will notice an icon on the left “Job Config History”.
If you click this option you will be presented with a page full of change history. You can compare entries and explore the XML for the faulty change. Note – the plugin doesn’t show you where in the GUI you have made the change so you will need to understand how XML works to find that yourself.
Hudson Tray Application – provides a Tray application that monitors this (and other) Hudson servers.
Wiki
This is a great little plugin that installs a simple app in the system tray that you can use to monitor the jobs on your CI server. The app means that you no longer have to log in via the browser to get an update on project statuses and you can even launch builds from the app itself.
Monitoring - Hudson/Jenkins' monitoring with JavaMelody.
Wiki
Download
Statistics make the world go round, right? It’s important to know if our servers are handling the strain of building our projects continuously. I strongly advise firing off a number of builds and seeing how well your server is performing. I’ve learnt a lot from just playing around and I’ve reached a nice performance from the build machines without risking out of memory errors.
Today I'm going to discuss how to create a project, organise it in a clever way using a smart directory structure and maintain it using source control. I was inspired to write this by a book called Game Coding Complete by Mike McShaffry et al.
To begin, I am assuming that you will be using Visual Studio, however the directory structure and source control can be adopted by anyone.
When creating a project, especially in Visual Studio, it can become very difficult to stay organised as more and more code is created/added. To overcome this common problem Mike proposes a file structure that is both diverse and expandable.
Here it is in its basic form:
Project Name
+ Docs
+ Media
+ Source
+ Obj
+ Bin
+ Test
Most of these are self explanatory but here's a simple overview:
Docs- This would typically include anything you would produce in an "Office" package, I would also advise storing all your UML here too.
Source- This can be expanded to include many child folders. Where I work this is usually split to replicate the different teams that will be working on the project, so you may find a DB, UI, Business and Common sub folder. For Games you would likely have AI, Graphics or 3rd_Party.
*Note - as a rule try to stick to the Linux convention of putting a _ instead of white space when naming files e.g. 3rd_Party instead of 3rd Party. I cant count how many times I have been caught out by errors relating to this at work.
Obj- anyone familiar with Visual Studio will be aware of the temp files created when building your project. One way of keeping your solutions folder organised would be to dump the temp files here... I will provide the VS configuration to do this later in the blog.
Bin- When you build a program you will be presented with a package (often a .exe). This is where you should have your compiler store that package. In this folder you would also have a Debug and Release sub folder where you can store your package depending on the configuration used for the build.
Here's a more advanced file structure (based on a typical game)
Project Name
+ Docs
+ Media
++ 3D_assets
+ Source
++ AI
++ Graphics
++ Maths/Physics
++ 3rd_Party
+ Obj
+ Bin
++ Debug
++ Release
+ Test
For this it's probably easier to show you with a few snapshots. From within you project Right click the solution, select properties and configure the project as shown below.
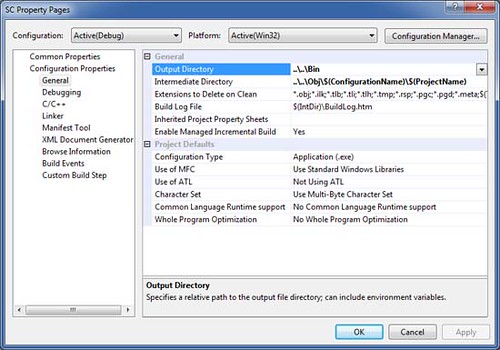
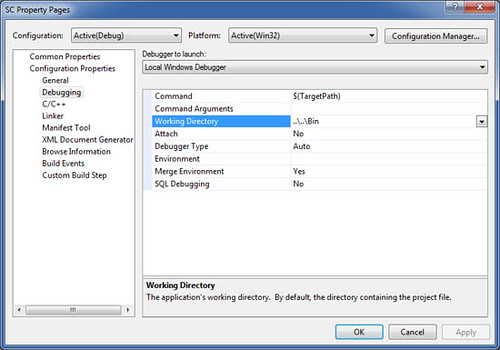
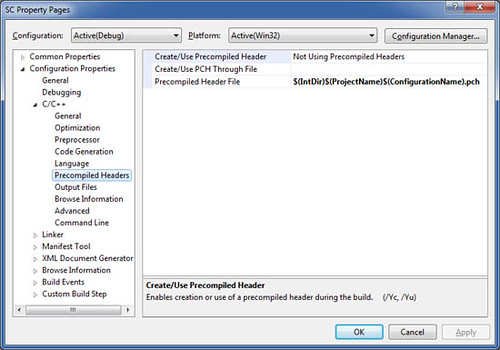
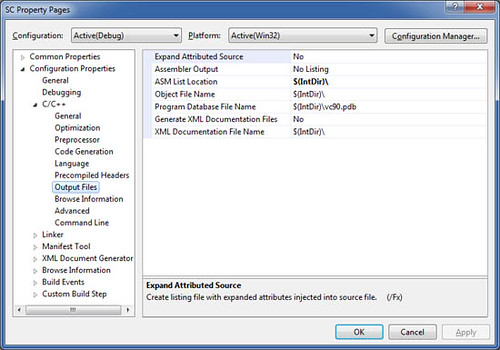
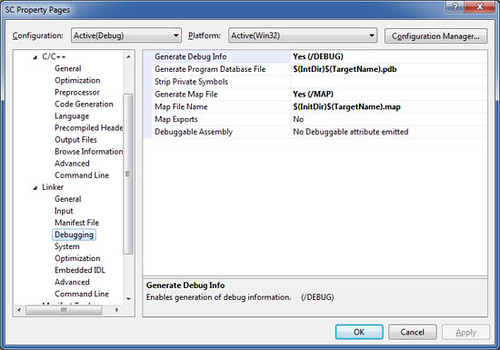
When you now build a project you should find that Visual studio now places the temp files in your obj folder and your release in bin. It's up to you to organise your source code but this is easy enough to do in Visual Studio.
I'm not going to discuss these here as there's plenty of information on-line about them. All you need to know is GC will act as your repository (a storage place for code) and TortoiseSVN is a GUI (Graphical User Interface) that enables you to use Subversion (a type of source control).
To begin with you will want to create a project on GC - you can call this anything you like just make sure you can identify which project it relates to. One thing to note is its not always possible to name the project what you want (normally as its saved on your PC) as a project with the same name may already exists.
Now that you have created project and given it an elegant directory structure its time to upload it to GC. To do this you will require your Google username and password but note the password is not the same as your Google account password.
To get the username simply log into GC and select the "Profile" menu - this will give you your user id and select "Settings" to obtain your password.
Finally, in windows explorer, right click your project directory to get the Tortoise context menu and choose "Import...". Tortoise will now prompt you for the repository url. Enter:
https://[project name].googlecode.com/svn/trunk
Enter your user id and password obtained earlier and watch your files and directories get uploaded to the GC repository. From now on you can use the
Tortoise repo-browser and other tools to access it via the url above.
To begin, I am assuming that you will be using Visual Studio, however the directory structure and source control can be adopted by anyone.
Directory Structure
When creating a project, especially in Visual Studio, it can become very difficult to stay organised as more and more code is created/added. To overcome this common problem Mike proposes a file structure that is both diverse and expandable.
Here it is in its basic form:
Project Name
+ Docs
+ Media
+ Source
+ Obj
+ Bin
+ Test
Most of these are self explanatory but here's a simple overview:
Docs- This would typically include anything you would produce in an "Office" package, I would also advise storing all your UML here too.
Source- This can be expanded to include many child folders. Where I work this is usually split to replicate the different teams that will be working on the project, so you may find a DB, UI, Business and Common sub folder. For Games you would likely have AI, Graphics or 3rd_Party.
*Note - as a rule try to stick to the Linux convention of putting a _ instead of white space when naming files e.g. 3rd_Party instead of 3rd Party. I cant count how many times I have been caught out by errors relating to this at work.
Obj- anyone familiar with Visual Studio will be aware of the temp files created when building your project. One way of keeping your solutions folder organised would be to dump the temp files here... I will provide the VS configuration to do this later in the blog.
Bin- When you build a program you will be presented with a package (often a .exe). This is where you should have your compiler store that package. In this folder you would also have a Debug and Release sub folder where you can store your package depending on the configuration used for the build.
Here's a more advanced file structure (based on a typical game)
Project Name
+ Docs
+ Media
++ 3D_assets
+ Source
++ AI
++ Graphics
++ Maths/Physics
++ 3rd_Party
+ Obj
+ Bin
++ Debug
++ Release
+ Test
Visual Studio Configuration
For this it's probably easier to show you with a few snapshots. From within you project Right click the solution, select properties and configure the project as shown below.


When you now build a project you should find that Visual studio now places the temp files in your obj folder and your release in bin. It's up to you to organise your source code but this is easy enough to do in Visual Studio.
Source Control using Google Code(GC) and TortoiseSVN
I'm not going to discuss these here as there's plenty of information on-line about them. All you need to know is GC will act as your repository (a storage place for code) and TortoiseSVN is a GUI (Graphical User Interface) that enables you to use Subversion (a type of source control).
To begin with you will want to create a project on GC - you can call this anything you like just make sure you can identify which project it relates to. One thing to note is its not always possible to name the project what you want (normally as its saved on your PC) as a project with the same name may already exists.
Now that you have created project and given it an elegant directory structure its time to upload it to GC. To do this you will require your Google username and password but note the password is not the same as your Google account password.
To get the username simply log into GC and select the "Profile" menu - this will give you your user id and select "Settings" to obtain your password.
Finally, in windows explorer, right click your project directory to get the Tortoise context menu and choose "Import...". Tortoise will now prompt you for the repository url. Enter:
https://[project name].googlecode.com/svn/trunk
Enter your user id and password obtained earlier and watch your files and directories get uploaded to the GC repository. From now on you can use the
Tortoise repo-browser and other tools to access it via the url above.
Subscribe to:
Posts (Atom)


